DIY: Reclaimed Barn Wood Bench
Have you ever finished a project and actually had some amazing wood LEFT OVER? I know, I know. It almost never happens to me either! But after finishing all the cuts for the in-wall storage cupboard (click here to read about that project!), I had enough reclaimed barn wood from Coast to Coast Barn Wood for a couple more projects. And, as I already had all the tools out, why not get started right away? Besides, I needed a bit of a break from the storage cupboard and we're waiting on the mirror to get cut so why not bang out a quick project.
The easiest (and quickest) project of the two was to create a bench for the master bathroom. Since The Hubs and I sometimes go to work at different times in the morning, so as to not disturb the other, having a bench to put on shoes, etc. would be enormously helpful. The caveat, we don't have a lot space so a short narrow bench is all we really have room for.
Luckily, we only needed to cut a few short bits from one of the lengths of reclaimed barn wood for the previous project which left us with one bit that was just about 33.5 inches long - more than enough room for one person! The bit was anywhere from 8 to 9.5 inches wide so not nearly as deep as a standard bench but plenty wide for a quick sit to put on your shoes in the morning.
After using a a large grit sandpaper to knock the worst of the roughness off the piece of wood, I switched to a finer grit to clean it up a bit more. I wanted to keep a lot of the character of the wood so I did not sand it down to bare wood. Once the sanding was completed, the next step was to clean it for the finish.
Quick Tip: For cleaning the dust off wood, I learned to use a tack cloth from my Grandpa. Using the tack cloth, wipe with the grain of the wood, making a couple of passes. It'll pick up all the dust and debris and be ready for the finish in no time!
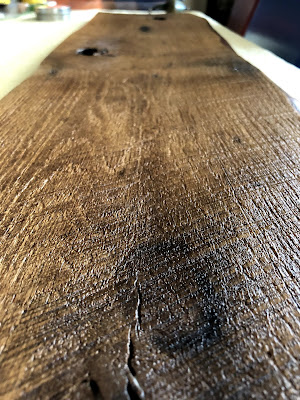
I used Minwax One Coat Polyurethane in a satin finish to seal the wood. But, instead of a single coat, I did two - which darkened the wood just a hair more and made it the perfect blend of rustic chic. It also brought out the darker red tones of the wood as well as the black character marks. I chose not to stain the wood because it darkened too much and hide the character marks which was the whole reason for buying reclaimed barn wood in the first place.
Quick Tip: Lightly sand with a very fine grit sandpaper between coats of polyurethane and clean with tack cloth before applying the next coat, it will give your finish a super smooth feel.
The final step was to attach legs to the wood plank. Since the wood was a bit narrower than is common and I have an aversion to hairpin legs, I had no choice but to have them custom made from a shop on Etsy called, Doug and Cristy Designs. I also wanted the legs to be a bit taller than normal. Cristy from Doug and Cristy Designs worked with me to create legs similar to these that were 18 inches tall and 7 inches wide and, bonus, they are strong enough to support a car so I think they can handle me putting on my shoes in the morning!
I flipped the wood over, placed the legs where I wanted them and marked the screw holes with a marker before I drilled a starter hole for the bolts. Once the initial holes were drilled, I went up to the correct size for the bolts. Screw the legs into the wood plank, tightening the bolts as you go and...Viola! Finished! Place it in Master Bathroom, toss a bit of humanely raised sheep skin over it for comfort; a little kilim accent pillow and it's on to the next project! Or at least finishing the previous one! 😉
The easiest (and quickest) project of the two was to create a bench for the master bathroom. Since The Hubs and I sometimes go to work at different times in the morning, so as to not disturb the other, having a bench to put on shoes, etc. would be enormously helpful. The caveat, we don't have a lot space so a short narrow bench is all we really have room for.
Luckily, we only needed to cut a few short bits from one of the lengths of reclaimed barn wood for the previous project which left us with one bit that was just about 33.5 inches long - more than enough room for one person! The bit was anywhere from 8 to 9.5 inches wide so not nearly as deep as a standard bench but plenty wide for a quick sit to put on your shoes in the morning.
 |
| The saw marks & dark spots in the leftover length of barn wood are what drew me too it in the first place - it has a story to tell! |
After using a a large grit sandpaper to knock the worst of the roughness off the piece of wood, I switched to a finer grit to clean it up a bit more. I wanted to keep a lot of the character of the wood so I did not sand it down to bare wood. Once the sanding was completed, the next step was to clean it for the finish.
Quick Tip: For cleaning the dust off wood, I learned to use a tack cloth from my Grandpa. Using the tack cloth, wipe with the grain of the wood, making a couple of passes. It'll pick up all the dust and debris and be ready for the finish in no time!
I used Minwax One Coat Polyurethane in a satin finish to seal the wood. But, instead of a single coat, I did two - which darkened the wood just a hair more and made it the perfect blend of rustic chic. It also brought out the darker red tones of the wood as well as the black character marks. I chose not to stain the wood because it darkened too much and hide the character marks which was the whole reason for buying reclaimed barn wood in the first place.
Quick Tip: Lightly sand with a very fine grit sandpaper between coats of polyurethane and clean with tack cloth before applying the next coat, it will give your finish a super smooth feel.
 |
| A close up of the legs that I ordered from Doug and Cristy Designs. |
The final step was to attach legs to the wood plank. Since the wood was a bit narrower than is common and I have an aversion to hairpin legs, I had no choice but to have them custom made from a shop on Etsy called, Doug and Cristy Designs. I also wanted the legs to be a bit taller than normal. Cristy from Doug and Cristy Designs worked with me to create legs similar to these that were 18 inches tall and 7 inches wide and, bonus, they are strong enough to support a car so I think they can handle me putting on my shoes in the morning!
I flipped the wood over, placed the legs where I wanted them and marked the screw holes with a marker before I drilled a starter hole for the bolts. Once the initial holes were drilled, I went up to the correct size for the bolts. Screw the legs into the wood plank, tightening the bolts as you go and...Viola! Finished! Place it in Master Bathroom, toss a bit of humanely raised sheep skin over it for comfort; a little kilim accent pillow and it's on to the next project! Or at least finishing the previous one! 😉
 |
| A perfectly comfy & quiet place to sit in the morning to put on your socks or tie shoes! |


Comments
Post a Comment