Building Your Own In-Wall Accessories Storage Cupboard - Part II
So to continue on with my accessories storage cupboard project, the next steps were to attach the moulding and build the door to the cupboard. Then to, finally, install it in into the cupboard frame that was already in the wall. If you missed Part I of the series, click here to get caught up.
If you remember back to Part I, one of the must-haves on my list was a door that swings open as well as a full length mirror. This is where that beautiful reclaimed barn wood comes into play. After going through several design ideas for the mirror frame, I finally decided on a look that I liked. The real struggle was trying to figure out how to build the mirror frame so that it could perform double duty as a hidden security door and storage space while also functioning as an actual, full-length mirror.
The keys elements for the door were that the mirror would need to be recessed into the barn wood far enough that it could be secured with a masonite and wood backing while still leaving enough room for the addition of the fixed, custom-made earring holders by Twiki Concepts and a skinny board with a series of hooks for necklaces. And, although finding the mirror sounds like it would be the easiest piece, we couldn't find one in the correct size so we had to have one custom-cut. Knowing that the mirror would be cut to fit relieved some of the pressure. We could build the door frame to fit the opening in the wall so the frame width itself could be exactly what I wanted and then simply pop-in the mirror to whatever size the final opening was.
The Hubs found a local source for reclaimed wood, Coast to Coast Barnwood, where I was able to pick out exactly the pieces that I wanted for the project. Although I know that a lot of folks covet the aged, grey wood; my preference is for wood with a reddish hue to it with a lot of black markings, wormholes, knots and the like. We had to dig a bit through their selection but I found three planks of amazing, red oak with some lovely character marks that screamed my name. We also purchased some reclaimed wood siding that would serve as the moulding around the edge of the cupboard to cover the gap between the cupboard frame and the sheetrock. Moulding is the easiest way to cover this gap and it prevents us from having to patch, texturize and paint the sheetrock wall. Not to mention, it'll give the mirror a layered, 3-dimensional affect.
Coast to Coast Barnwood was able to plane one side of both the barn wood and the siding for us for a nominal fee. Frankly, it was worth it just for the straight-up hassle factor. The reason we wanted to have only one side planed was so that we would then have a single flat surface to work with. It was this flat, even surface that would be attached to the wall. I wanted to keep the character marks of both of the barn wood and the siding so I asked them to plane the side with the "least character" and they nailed it!
But first, we had to treat both the siding and barn wood for termites and other creepy crawlers before we could start cutting and assembling the frame. There are already a lot of great tutorials out there so rather than reinvent the wheel, we used the Borax method found here. In the desert where the heat is high (especially this time of year) and the humidity low, it was important to weight the wood down as it dried to prevent it from warping and buckling.
To install the wood siding as moulding, we measured the horizontal short pieces first to use them as our guide for the longer side pieces. Like the inspiration piece above, I wanted the side pieces of the door frame to be the longer pieces in order to give the visual illusion that the walls were taller than they actually are. Therefore, the moulding needed to run exactly like the door frame since some of the moulding would be visible under the door. Once the shorter pieces were measured and cut, we taped them up and then measured for and cut the side pieces. Then we taped up everything make sure the length was correct before staining.
In order to create more usable mirror space, we chose to run the door frame a bit longer than the opening itself by about 2" so the moulding at the bottom is that much wider than the top. However this won't be noticeable at all when the door is closed and will allow me to make sure my shoes match my outfit. 😉
With the moulding cut, it was time to stain. I selected two stains to try, both by Minwax. I chose Honey and Red Mahogany. Using a bit of the scrap moulding, I stained two swaths to see which color I would like best on the wood siding we selected. Ultimately, neither one was exactly what I was looking for so I created a custom stain mix using both colors. I mixed 3 parts of the Honey stain with 1 part of Red Mahogany to create the warmer, slightly reddish color I was looking for without turning it into a cherry color. A single coat of stain was all it took to achieve the color I wanted before coating with a single coat of Minwax satin finish polyurethane.
Attaching the moulding to the cupboard frame was a relatively quick and easy. We were able to complete it in one evening after a full workday! But, it did take the two of us. Just like when we took the original measurements, we did the horizontal top piece first. We used construction adhesive along the back side to secure the moulding to the parts of the wall were there are no studs to nail into. Applying the adhesive first, I would position and hold the moulding in place with the interior edge flush against the inner edge of the cupboard while The Hubs would use a finish nailer to secure it in place. Repeat until all the moulding pieces are securely attached to the wall.
Once the barn wood was sanded and cut to size for the door frame, the second step was to cut the four sides to the lengths needed and drill the openings for the pocket screws. Since we didn't have the appropriate jigs and router needed to create the pocket screw holes or router out the backside to accommodate the mirror, The Hubs was off to my Uncle's woodshop. They screwed the frame together with the pocket screws and some wood glue.
Quick Tip: To keep the character of the barn wood, use a rough grit sandpaper very lightly to just knock off the sharp edges followed by a very fine grit to clean them up.
After using a a large grit sandpaper to knock the worst of the roughness off the pieces of wood, I switched to a finer grit to clean up the wood a bit more. I wanted to keep a lot of the character of the wood so I did not sand it down to bare wood. Once the sanding was completed, the next step was to clean it for the finish.
I used Minwax One Coat Polyurethane in a satin finish to seal the wood. But, instead of a single coat, I did two which darkened the wood just a hair and made it the perfect blend of rustic chic. It also brought out the darker red tones of the wood as well as the black character marks. After testing the stain I had mixed up for the moulding on a scrap bit of barn wood, I chose not to stain the wood because it darkened the wood way too much for my tastes. And it also didn't match in color or tone with the wood moulding that it would lay up against when the door was closed. Not to mention, the stain hid the character marks which was the whole reason for buying reclaimed barn wood in the first place.
Quick Tip: A tack cloth will pick up all the dust and debris quickly from the wood before you put any sort of finish on it.
We knew that the mirror we planned on using would be custom-cut to size and 1/8" thick. And, the masonite backing would also be 1/8" thick. We used masonite because it's lighter than plywood and since this mirror was also going to be a door held up by hinges, weight was definitely a consideration! So The Hubs and Uncle used the router to create a stepped down effect in the backside of the barn wood frame where the mirror would sit in first with the masonite on top of it. Once both pieces are in, it should be level with the backside of the barn wood. A little silicon mirror adhesive on the back of the mirror and then pressing the masonite into it would stabilize the mirror and provide some security - especially once the plywood backing was screwed into place.
Next, we cut the openings for the hinges. What this means is that the plywood backing had to be temporarily secured to the frame to cut out the opening for the hinges. We had planned to attach the plywood to the frame with screws in the event that it ever needed to be removed to change out the mirror. So The Hubs used screws to secure it to the frame before cutting out the recessed opening with the help of my Uncle. We chose to use European-style hinges from Rockler.
After the hinge openings were cut, I finished painting the plywood backing for the door frame. In keeping with the waxed and antiqued Art Deco theme that is prevalent throughout the rest of the cupboard's interior, I painted and stenciled the same design on the plywood backing. The only change in the design was that prior to waxing it, I had The Hubs use a black paint pen and write a note in the corner of the wood. The entire cupboard was a Mother's Day / Birthday gift so having a little personalization from him made it all the more special to me! Once he wrote the message, I waxed the entire backing to not only seal it but to also provide the same antiqued look as the rest of the cupboard. I also stained the edge of the plywood to match the moulding since it would be seen from the mirror's edge.
Quick Tip: Cut the final backing as early as you can in the process so that the wax can be curing while you finish all the other smaller details to save time on the assembly end of the project.
Finally, we installed the mirror and multi-layer backing to the entire door frame. It is important to note that you should never use liquid nails to secure the mirror, doing so can cause the mirror to get an aged look because it causes the silver finish to tarnish over time. You should always use a silicon based adhesive designed specifically for mirrors in order to preserve the overall finish of the mirror itself.
Once the door frame was completely assembled, we were ready to attach it to the cupboard frame. Another two-person job! Because of the weight of the frame, we decided to use four hinges to ensure that as time went on, there would be no sagging of the door from the cupboard frame - or any chance that it could pull out of the wall as a result of the door's weight. The first part was to attach all the hinges to the door before attaching them to the cupboard frame. Once that was complete, The Hubs held up the door while I screwed the remaining hinges into the cupboard frame.
Now that the door was attached to the cupboard, I had to determine exactly where to place the earring and necklace holders on its back side so that they would not interfere with the interior shelving when the door was closed while still allowing the door to close securely. Because the European-style hinges have to be mounted close to the edge of the door frame in order to swing outward with enough clearance, they also create minimal overlap between the cupboard frame and its molding and the door frame itself. The result is that the center point of the door and the center point of the interior cupboard structure do not line up - there is an offset - which is why it was important to find out exactly where the interior cupboard lined up on the backside of the door frame.
Once that was accomplished, I could install the earring and necklace holders. As I said before, I had the earring holders custom-made by Twiki Concepts. Because I wanted to have a bit of clearance between them and the door frame to accommodate earring backs, I attached them using bits of hard plastic electrical conduit. This was a simple install that allowed a lot of freedom in where to hang different types of earrings.
The necklace holder was created by utilizing several 1/2" x 8 1/2" pieces of left over barn wood strips that I that I finished to match the barn wood door frame and a burlap jewelry tray insert. One concern I had was that every time the door would close, the necklaces would swing and bounce against the hardwood back of the door - potentially damaging them. To alleviate this problem, I used elastic from the fabric store and secured it to the tray inserts, leaving enough slack to be able to slide the necklaces behind it to prevent them from swinging.
I stapled black, extra large staples partially into the bottom-side of the barn wood strips. The final step in creating the necklace holder was to screw the strips through the jewelry tray inserts into the wood backing. I attached the necklace holders to the back of the door frame with small screws in the four corners.
If you remember back to Part I, one of the must-haves on my list was a door that swings open as well as a full length mirror. This is where that beautiful reclaimed barn wood comes into play. After going through several design ideas for the mirror frame, I finally decided on a look that I liked. The real struggle was trying to figure out how to build the mirror frame so that it could perform double duty as a hidden security door and storage space while also functioning as an actual, full-length mirror.
 |
| This was the mirror (that can be found here) that I used as inspiration for our project. I used reclaimed barn wood to match the reclaimed Douglas Fir that our bed frame is made out of. As much as I love this mirror, it wasn't made for the purpose we needed - not to mention its expense - but the design itself is definitely the vibe we were looking for. |
The keys elements for the door were that the mirror would need to be recessed into the barn wood far enough that it could be secured with a masonite and wood backing while still leaving enough room for the addition of the fixed, custom-made earring holders by Twiki Concepts and a skinny board with a series of hooks for necklaces. And, although finding the mirror sounds like it would be the easiest piece, we couldn't find one in the correct size so we had to have one custom-cut. Knowing that the mirror would be cut to fit relieved some of the pressure. We could build the door frame to fit the opening in the wall so the frame width itself could be exactly what I wanted and then simply pop-in the mirror to whatever size the final opening was.
The Hubs found a local source for reclaimed wood, Coast to Coast Barnwood, where I was able to pick out exactly the pieces that I wanted for the project. Although I know that a lot of folks covet the aged, grey wood; my preference is for wood with a reddish hue to it with a lot of black markings, wormholes, knots and the like. We had to dig a bit through their selection but I found three planks of amazing, red oak with some lovely character marks that screamed my name. We also purchased some reclaimed wood siding that would serve as the moulding around the edge of the cupboard to cover the gap between the cupboard frame and the sheetrock. Moulding is the easiest way to cover this gap and it prevents us from having to patch, texturize and paint the sheetrock wall. Not to mention, it'll give the mirror a layered, 3-dimensional affect.
Coast to Coast Barnwood was able to plane one side of both the barn wood and the siding for us for a nominal fee. Frankly, it was worth it just for the straight-up hassle factor. The reason we wanted to have only one side planed was so that we would then have a single flat surface to work with. It was this flat, even surface that would be attached to the wall. I wanted to keep the character marks of both of the barn wood and the siding so I asked them to plane the side with the "least character" and they nailed it!
But first, we had to treat both the siding and barn wood for termites and other creepy crawlers before we could start cutting and assembling the frame. There are already a lot of great tutorials out there so rather than reinvent the wheel, we used the Borax method found here. In the desert where the heat is high (especially this time of year) and the humidity low, it was important to weight the wood down as it dried to prevent it from warping and buckling.
To install the wood siding as moulding, we measured the horizontal short pieces first to use them as our guide for the longer side pieces. Like the inspiration piece above, I wanted the side pieces of the door frame to be the longer pieces in order to give the visual illusion that the walls were taller than they actually are. Therefore, the moulding needed to run exactly like the door frame since some of the moulding would be visible under the door. Once the shorter pieces were measured and cut, we taped them up and then measured for and cut the side pieces. Then we taped up everything make sure the length was correct before staining.
 |
| The moulding taped up so we see what we were working with for the bottom pieces. |
In order to create more usable mirror space, we chose to run the door frame a bit longer than the opening itself by about 2" so the moulding at the bottom is that much wider than the top. However this won't be noticeable at all when the door is closed and will allow me to make sure my shoes match my outfit. 😉
 |
| Here, you can see the home the bottom moulding is wider than the other surrounding moulding. This allows the door to be larger while giving the symmetrical appearance I wanted when the door is closed. |
With the moulding cut, it was time to stain. I selected two stains to try, both by Minwax. I chose Honey and Red Mahogany. Using a bit of the scrap moulding, I stained two swaths to see which color I would like best on the wood siding we selected. Ultimately, neither one was exactly what I was looking for so I created a custom stain mix using both colors. I mixed 3 parts of the Honey stain with 1 part of Red Mahogany to create the warmer, slightly reddish color I was looking for without turning it into a cherry color. A single coat of stain was all it took to achieve the color I wanted before coating with a single coat of Minwax satin finish polyurethane.
 |
| The difference in tones is subtle and, although it may be hard to tell in the photo, there is a warmer tone to the custom mix than the Honey without the purplish hues of the Red Mahogany. |
Attaching the moulding to the cupboard frame was a relatively quick and easy. We were able to complete it in one evening after a full workday! But, it did take the two of us. Just like when we took the original measurements, we did the horizontal top piece first. We used construction adhesive along the back side to secure the moulding to the parts of the wall were there are no studs to nail into. Applying the adhesive first, I would position and hold the moulding in place with the interior edge flush against the inner edge of the cupboard while The Hubs would use a finish nailer to secure it in place. Repeat until all the moulding pieces are securely attached to the wall.
 |
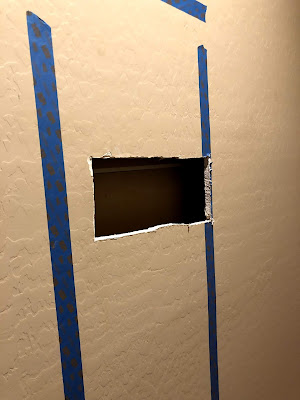
| The reclaimed siding hides the opening & shims between the cupboard frame and wall studs. Once the door is attached, a bit of the moulding will be visible giving the mirrored door frame a multi-dimensional appearance. |
Once the barn wood was sanded and cut to size for the door frame, the second step was to cut the four sides to the lengths needed and drill the openings for the pocket screws. Since we didn't have the appropriate jigs and router needed to create the pocket screw holes or router out the backside to accommodate the mirror, The Hubs was off to my Uncle's woodshop. They screwed the frame together with the pocket screws and some wood glue.
Quick Tip: To keep the character of the barn wood, use a rough grit sandpaper very lightly to just knock off the sharp edges followed by a very fine grit to clean them up.
 |
| It's always helpful when you've got a woodworker in the family! |
After using a a large grit sandpaper to knock the worst of the roughness off the pieces of wood, I switched to a finer grit to clean up the wood a bit more. I wanted to keep a lot of the character of the wood so I did not sand it down to bare wood. Once the sanding was completed, the next step was to clean it for the finish.
I used Minwax One Coat Polyurethane in a satin finish to seal the wood. But, instead of a single coat, I did two which darkened the wood just a hair and made it the perfect blend of rustic chic. It also brought out the darker red tones of the wood as well as the black character marks. After testing the stain I had mixed up for the moulding on a scrap bit of barn wood, I chose not to stain the wood because it darkened the wood way too much for my tastes. And it also didn't match in color or tone with the wood moulding that it would lay up against when the door was closed. Not to mention, the stain hid the character marks which was the whole reason for buying reclaimed barn wood in the first place.
Quick Tip: A tack cloth will pick up all the dust and debris quickly from the wood before you put any sort of finish on it.
We knew that the mirror we planned on using would be custom-cut to size and 1/8" thick. And, the masonite backing would also be 1/8" thick. We used masonite because it's lighter than plywood and since this mirror was also going to be a door held up by hinges, weight was definitely a consideration! So The Hubs and Uncle used the router to create a stepped down effect in the backside of the barn wood frame where the mirror would sit in first with the masonite on top of it. Once both pieces are in, it should be level with the backside of the barn wood. A little silicon mirror adhesive on the back of the mirror and then pressing the masonite into it would stabilize the mirror and provide some security - especially once the plywood backing was screwed into place.
Next, we cut the openings for the hinges. What this means is that the plywood backing had to be temporarily secured to the frame to cut out the opening for the hinges. We had planned to attach the plywood to the frame with screws in the event that it ever needed to be removed to change out the mirror. So The Hubs used screws to secure it to the frame before cutting out the recessed opening with the help of my Uncle. We chose to use European-style hinges from Rockler.
After the hinge openings were cut, I finished painting the plywood backing for the door frame. In keeping with the waxed and antiqued Art Deco theme that is prevalent throughout the rest of the cupboard's interior, I painted and stenciled the same design on the plywood backing. The only change in the design was that prior to waxing it, I had The Hubs use a black paint pen and write a note in the corner of the wood. The entire cupboard was a Mother's Day / Birthday gift so having a little personalization from him made it all the more special to me! Once he wrote the message, I waxed the entire backing to not only seal it but to also provide the same antiqued look as the rest of the cupboard. I also stained the edge of the plywood to match the moulding since it would be seen from the mirror's edge.
 |
| Close up of the wire cover panel. It is an accessories cupboard after all! |
Quick Tip: Cut the final backing as early as you can in the process so that the wax can be curing while you finish all the other smaller details to save time on the assembly end of the project.
Finally, we installed the mirror and multi-layer backing to the entire door frame. It is important to note that you should never use liquid nails to secure the mirror, doing so can cause the mirror to get an aged look because it causes the silver finish to tarnish over time. You should always use a silicon based adhesive designed specifically for mirrors in order to preserve the overall finish of the mirror itself.
Once the door frame was completely assembled, we were ready to attach it to the cupboard frame. Another two-person job! Because of the weight of the frame, we decided to use four hinges to ensure that as time went on, there would be no sagging of the door from the cupboard frame - or any chance that it could pull out of the wall as a result of the door's weight. The first part was to attach all the hinges to the door before attaching them to the cupboard frame. Once that was complete, The Hubs held up the door while I screwed the remaining hinges into the cupboard frame.
 |
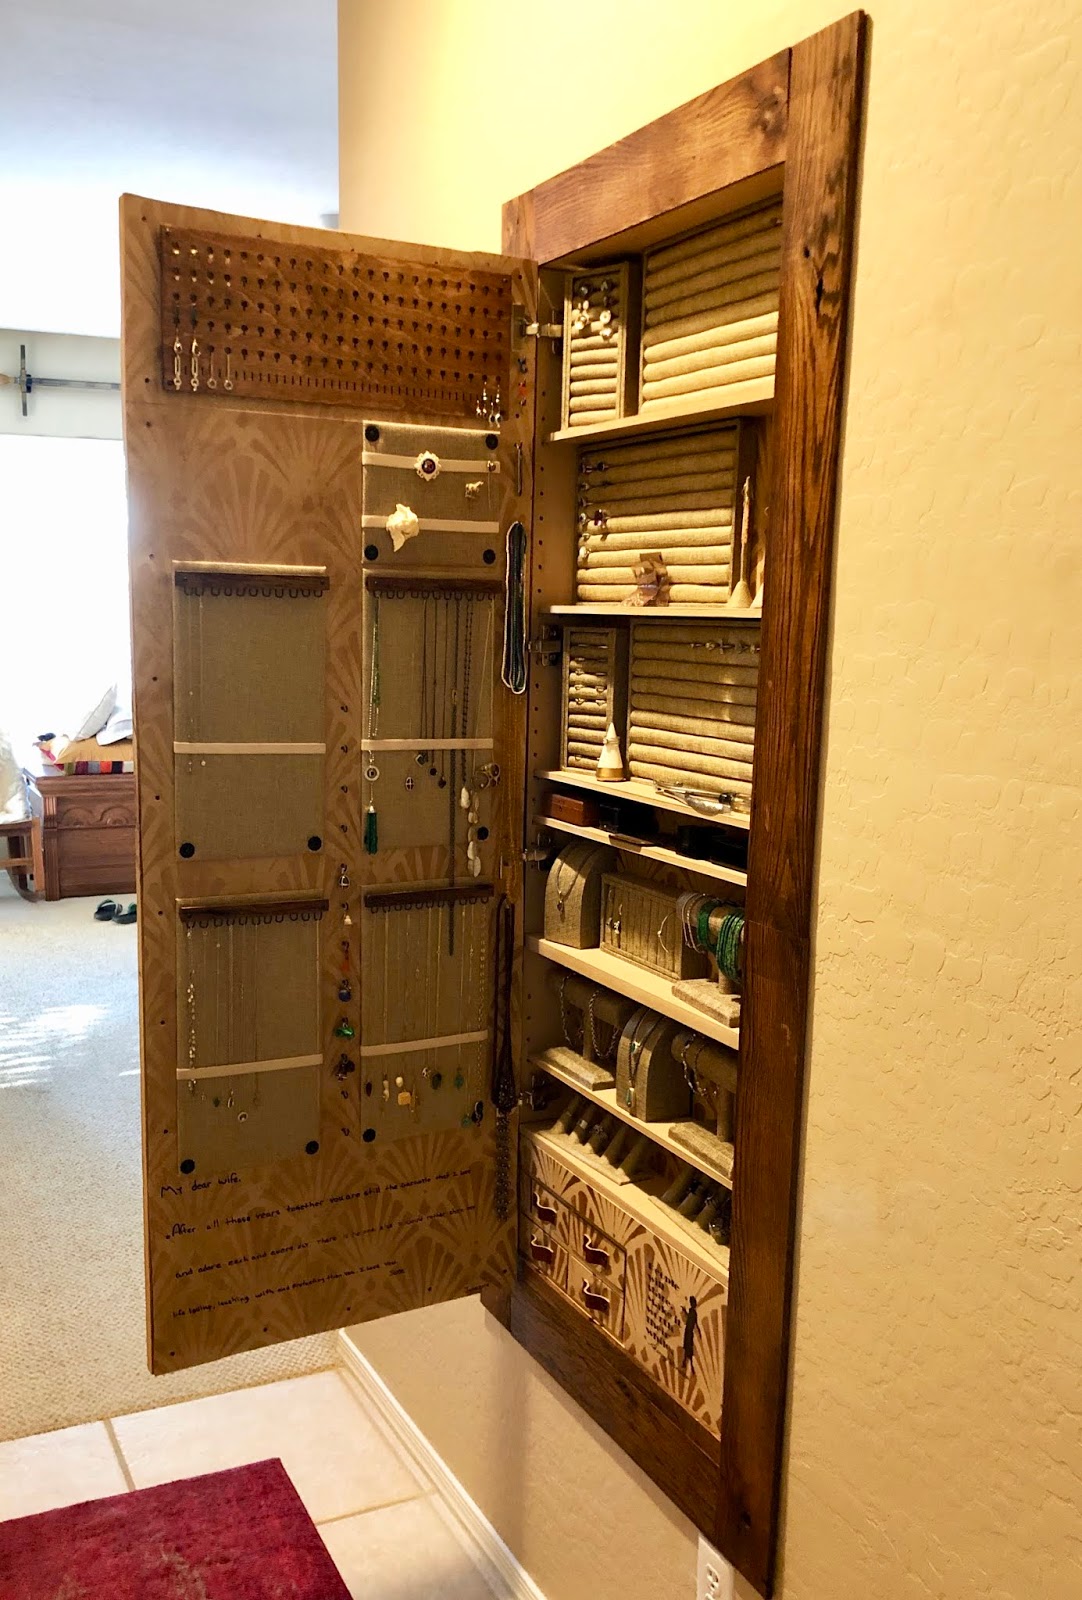
| The finished project! The hidden hinges don't draw attention to the interior components and the use of the barn wood siding as moulding gives it a multi-dimensional feel rather than looking like a flat mirror hung on the wall. |
Now that the door was attached to the cupboard, I had to determine exactly where to place the earring and necklace holders on its back side so that they would not interfere with the interior shelving when the door was closed while still allowing the door to close securely. Because the European-style hinges have to be mounted close to the edge of the door frame in order to swing outward with enough clearance, they also create minimal overlap between the cupboard frame and its molding and the door frame itself. The result is that the center point of the door and the center point of the interior cupboard structure do not line up - there is an offset - which is why it was important to find out exactly where the interior cupboard lined up on the backside of the door frame.
Once that was accomplished, I could install the earring and necklace holders. As I said before, I had the earring holders custom-made by Twiki Concepts. Because I wanted to have a bit of clearance between them and the door frame to accommodate earring backs, I attached them using bits of hard plastic electrical conduit. This was a simple install that allowed a lot of freedom in where to hang different types of earrings.
 |
| The burlap jewelry tray insert serves as the backing for the necklace holders and keeps the necklaces from bouncing against the wood itself when the door close. |
The necklace holder was created by utilizing several 1/2" x 8 1/2" pieces of left over barn wood strips that I that I finished to match the barn wood door frame and a burlap jewelry tray insert. One concern I had was that every time the door would close, the necklaces would swing and bounce against the hardwood back of the door - potentially damaging them. To alleviate this problem, I used elastic from the fabric store and secured it to the tray inserts, leaving enough slack to be able to slide the necklaces behind it to prevent them from swinging.
 |
| The finished brooch (top left) and necklace holders on the back side of the door. The tacks set into the underside of the scrap barn wood strips allow enough room to hang the necklaces and keep them secure since the chains themselves slip through and fasten. |
I stapled black, extra large staples partially into the bottom-side of the barn wood strips. The final step in creating the necklace holder was to screw the strips through the jewelry tray inserts into the wood backing. I attached the necklace holders to the back of the door frame with small screws in the four corners.
 |
| Plenty of room for all the accessories in between the studs! |
The final touches included adding the jewelry inserts in the cupboard itself. Although jewelry is regularly seen displayed on black, maroon or ivory velvet, I wanted something a bit more befitting our rustic modern home decor that was also a bit of a contrast to the Art Deco design elements throughout the cupboard. I found several jewelry displays in burlap. The color went together well with the colors I had chosen for the interior of the cupboard and would easily show off a variety of accessories.
Because I had to order several of each style, I did a good bit of research in trying to locate the best prices for each of the display pieces that I thought I might utilize in organizing my accessories. Initially, I ordered one of each so I could play with different layouts to see what worked best. I also decided not to permanently affix the inserts into the cupboard so that I could modify the layout as my collection changed. In the end, my go-to resource was JewlerySupply.com. The prices were the best for the burlap pieces that I was looking for.
Even though it was a bit more than a weekend project for The Hubs and I (mainly because of my desire to be involved in the design process 😉), it was well worth the time and effort to get exactly what I wanted! And, because we did it ourselves, I know that it will hold up to the years of daily use in its future. So although it took up our weekends for several months, I couldn't be happier with the end result!
Comments
Post a Comment