When you live in an area where storage space is at a premium, you find creative ways to increase it. Some common solutions include furniture that does double-duty; minimizing decor items that would need to be stored; professionally organized closets to maximize what storage is available; etc.
But how do you create storage for items that you may want regular access to in a home with no basement and no usable attic to speak of? The average interior wall is just under four inches deep. It may not sound like a lot of usable area but depending upon your storage needs, there is a lot to be said for tapping into this forgotten space.
When I was looking for storage options for small accessory items, this was one of the options that I considered. I looked at several mass produced options including
this sliding mirrored door option from
CS Hardware. They also can create custom-sized options to fit your provided measurements. Although of the many options that I researched, I certainly preferred CSH, it still wasn't
exactly what I wanted.
I was looking for something with the following options:
- Door that swings open
- Storage on the back of the door
- Multiple adjustable shelves
- Drawers for small, loose item storage
- Full length mirror
What I needed was a place to store all my accessories so that I could easily rearrange and adjust as my needs and collection grew or changed over the years. After all, this was going to be a permanent part of the house once it was built so it would need to stand the test of time. And, it needed to be flexible in order to provide optimized space as my needs grew.
I had an idea in my head what I wanted it to look like. But, we wouldn't know for sure if what I wanted was even possible until we opened up the wall and took a look inside. So first things first, we mapped out the potential dimensions with blue painters tape and then cut a small section of the wall inside those dimensions to see how much space we really had to work with between the studs. None of the interior walls in our home are load bearing and they all tend to be on 26" center studs - so that's quite a bit of space to work with for what our needs are. The catch, in this case, was that the wall I had chosen had an electrical outlet in it.
Once the small space was opened up, there was no going back! We determined what height as well as how close to the floor we wanted the opening to be. For width, we opened the wall up to the edge of each of the studs.
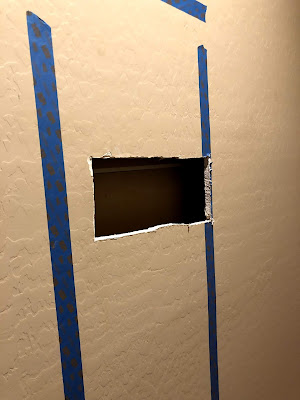 |
| Originally, we used blue painter's tape to visualize where the studs were & approximate the height of the cupboard. We cut the small opening within the confines of the tape to see into the wall. |
Once the area was fully open, we were able to see just how high up into the studs the wires for the electrical box ran. We thought of several options including: moving the wires lower into the studs; covering them up with a small box; removing the electrical outlet or shortening the depth of the cabinet itself to have the wires run under it and more.
 |
| The full opening in the wall gave us the full dimensions of the opening from stud to stud and the height that was reasonable for what I needed in the space. |
In the end, we decided to save the money that we would have had to pay an electrician to relocate the wires and still keep the height and depth of the cupboard as well as saving the electrical outlet. We accommodated the wires by redesigning the interior of the cupboard and creating a small area that would essentially box the wires in and hide them from view without changing anything. Granted, I lost some storage space in the opening this way but it allowed me to get more creative with the interior look of the cupboard. But, I'll go more in to that in Part II.
 |
| The electrical wires for the outlet where run through the wall studs about 16" up from the floor - right in the lower portion of what would become the interior of the cupboard. |
Once the design was finalized with the accommodations for the electrical wiring, The Hubs drew out the dimensions on some grid paper and we fine tuned the interior layout. In the end, I was able to include four small drawers, two fixed shelves (for stability) and six adjustable shelves. The backside of the swinging door would accommodate hanging items such as necklaces and earrings.
 |
| The final rendering that The Hubs created of the cupboard with the fixed shelves, drawer cabinet & wire box cover. |
I found the most ideal
earring holder from
Twiki Concept on Etsy. And, BONUS, Patricia from Twiki Concept is available to make them in custom sizes and styles to work in any space! (See photos of the finished project in Part II.) I would be able to mount it to the back of the cupboard door using wooden dowels as spacers to allow for some movement in order to accommodate earring backs.
To create the internal cupboard structure, The Hubs purchased some 4" x 1" select pine from our local Lowe's Home Improvement to make the four sides, shelves and drawer structures. We used 0.25" thick pine plywood for the backing and wire box cover. Normally, I prefer a hard wood with a lot of graining. However, in this instance, I knew I would be painting the entire interior rather than staining it so a softer wood without much grain was fine. The molding and door frame would be reclaimed barn hard wood. The overall, finished measurements of the cupboard frame are approximately 55.75" tall by 23.25" wide and roughly 3.75" deep.
 |
| Fitting the adjustable shelves & fixed shelves into the cupboard frame to ensure the measurements are correct. |
The Hubs built the cupboard according to the dimensions that he had drawn out using the two fixed shelves to stabilize and strengthen the cupboard frame. These one of the two fixed shelves also serves as the upper moulding brace for the wire box cover (This will make more sense when you see the finished project in Part II). The internal drawer cabinet and the bottom of the frame itself would serve as other braces for the wire box covering.
 |
| The four drawers fit in the lower, left cabinet while the opening that is shaped roughly like the State of Oklahoma is our creative (& cheaper) solution to accommodate the electrical wires in the wall. |
The Hubs cut all the pieces to length as well as the recessed the areas for the drawers, fixed shelves and the bracket holes for the adjustable shelves. Luckily, we have a very experienced woodworker in our family who was nice enough to loan The Hubs and I his wood shop for a week while he was out of town. This allowed us to get the frame and everything cut and assembled with some specialized tools - most important of which was the
Shelf Pin Drilling Jig from
Rockler. This specialized tool made the job go so much faster! It allowed The Hubs to drill all the shelf bracket holes in an easy, quick and consistent manner rather than having to individually mark and drill each one. This tool also ensures that the bracket holes will be evenly spaced which is important if you want your shelves to be level when you put them in.
Once it was all cut, we test fit everything to make sure all the shelf bracket holes lined up before permanently assembling. With a finish nailer, wood glue and a few clamps, The Hubs assembled the frame and internal drawer cabinet. He left the plywood backing off of the cupboard frame. We would attach it when the entire cupboard is ready to be permanently installed.
Then we test fit the assembled cupboard frame into the opening. The Hubs cut two additional 2"x4" have studs to serve as a platform thereby providing support for the weight of the cupboard along the bottom of the cupboard. They would allow some of the cupboard's weight to be distributed evenly along the base when they were screwed into along with the existing wall studs.
 |
| Dry fitting the frame into the opening. Obviously it will need to be shimmed & screwed into the wall studs. |
We decided that it would be much easier for me to paint the interior of the cupboard prior to installing it in the wall. Once installed, I could do any touch-up painting which might be needed. I decided that I wanted the interior to have a bit of an Art Deco flair to it. Although I would describe the overall look of our house as something a bit more Rustic Modern, I have always loved the geometric patterns of Art Deco design. The chandelier in our master closet is an authentic Art Deco leaded crystal work of art that I completely adore! Typical Art Deco design includes bold color combinations such as black and gold with repeating geometric patterns.
Bold color combinations and typical Art Deco patterns weren't really a good fit for a Santa Barbara Tuscon tract home like ours in the Southwest. In order to still use the same geometric, repeating pattern that loved (and was similar in design to the aforementioned chandelier), I picked out a more subtle color palette. I selected
Camelback by HGTV Home by Sherwin-Williams in a satin finish from Lowe's for the base color. For the stencil color, I picked out
Deep Bronze Metallic acrylic paint by Craftmart from Michael's.
Once the base color was applied (I did three coats), I used a wall stencil for the entire back panel, front of the drawers and wire box cover. I found a thick, reusable stencil for a reasonable price on Etsy by
Gypsy Mint Stencils. I selected the
Art Deco Allover Stencil since it was similar in style to the chandelier. I know a lot of folks use a spray adhesive with their stencils. Since I had planned on using an antiquing wax, I wasn't concerned with getting a perfectly applied stencil. In fact, the rustic look would be a nice way to blend the Art Deco design with our rustic modern home. Although no one but The Hubs and I would really ever see the interior of the cupboard, I still wanted it to look professional and cohesive with the our existing decor.
 |
| The stencil pattern that I chose mimics the Art Deco chandelier in the master closet. |
Once the
Deep Bronze Metallic paint was dry, I felt like the wire box cover needed a little something extra. I felt like the finishing touch was a custom stencil with a flapper silhouette with a quote. I found a fabulous seller (also on Etsy),
Go Stencil, who created a
custom stencil for me with a Harry Winston quote and silhouette. I mean,
it is a jewelry / accessories cupboard after all!
 |
| A proof of the stencil created by Go Stencil created for wire cover. The available space for the stencil was 5" tall by 6" wide. |
Now that all the stencils are finished, the final step was applying the antique wax. I used the
Dark Antique Wax by
Amy Howard Home. Helpful hint, let the wax dry the full one hour before buffing it off. Once it's buffed off, let it sit and cure for several days. After a few days, I buffed it a bit more to make sure any residual wax was either removed or worked deeper into the crevices of the wood. As a side note, I applied the antiquing wax to the entire cupboard - even those parts which did not have any stenciling on them - the reasoning behind this is because the wax provides a not only finish but also seals the wood, even painted wood. And, as you will see in Part II, it does darken and age the base color just enough to give the cupboard a real "live-in" feel to it.
 |
| The dark antiquing wax make the metallic bronze paint shine while still giving the back panel the appearance of having been an original 1920s piece that has aged over the past 100 years while it was hidden away in our wall. |
The final part was to install the drawer handles. Even though the drawers are a bit recessed into the cupboard frame, there is still not a lot of clearance for pulls or handles. My solution was an "ah-ha" moment that I had when I read Sally Scheinder's blog,
Improvised Life, where she talked about creating
drawer pulls using old leather belts. Although my drawer pulls are a bit different in style, the idea is similar. I cut some scrap leather in 3" lengths. I bent them in half, using a binder clip to hold each length folded, I drilled a hole in the ends for the screws to go through which would attach them to drawers. To attach, I placed one end of the pull on eat drawer front where I wanted it to be and then screwed it down. Next, I placed a sharpie pen under the leather and then lined up the placement of the other end of the leather so it appeared straight and screwed it down. After removing the sharpie, a loop is created which allows me to slide my finger in to pull the drawer open. The advantage is that the handles are still flexible enough that the leather won't interfere with the cupboard door when it's closed,
 |
| The scrap leather handles are flexible enough to not interfere with the cupboard door when it closes but also add a bit of the rustic flair that is prevalent throughout our home. |
To install the cupboard frame into the opening, The Hubs first put the back panel onto the frame with finishing nails. Then, much like installing a regular, frame-hung door, he needed to shim the cupboard frame into opening against the existing wall studs. Once the interior cupboard was shimmed level, he used long, wood screws to secure it in place along both wall studs and the support base that he had built previously.
 |
| All shimmed & screwed into place! We're almost there! |
Now, the next step in the process is to attach the moulding and build the reinforced, mirrored door! Stay tuned for Part II of this creation! (Teaser: There's barn wood involved!)
 |
| Reclaimed wood siding is the perfect compliment to reclaimed barn wood! (Ignore my messy garage!) |


Comments
Post a Comment