Where to Begin?
When you're moving into a new place - or in our case, a new-to-us-place - the first thing anyone wants to do is make it feel like their "home." We're no different. We're a blended family so The Hubs and I really wanted to create a home that felt like both of us. That meant not just a new structure but also some new furniture and some updating.
But where do you start?
For us, we decided that the perfect place to start was the room that we typically spend the most amount of time in - the living room!
This room would be our one really big splurge. It would be the focal point of our home. And what it needed was a media wall! I'm not talking about just a big television and all the components. I'm talking about a wall that was, in a lot of ways, a work of art.
So we reached out to a local company called Stone Creek to discuss what we had in mind. We worked with one of their designers to create the exact vision of what we wanted. In our initial conversations with our designer, Ariel, we told her about how this home was to be our "retirement" home and how we wanted it to be timeless, classic and yet still have a rustic, homey feel to it. We wanted people to feel comfortable when they came in the front door. It had to not only compliment the style of the house and the community we lived in but also be reflective of us and our tastes. We wanted something that would allow for an area to display artwork and pottery as well as allow for the television components to be "hidden" from view. And, as The Hubs insisted, it had to be able to accommodate almost any size television that he wanted to put up there!
Initially, the dream was rough-hewn, solid cherry beams and stacked slate columns to give our "Santa Barbara Tuscan" style tract home a little more rustic feel without creating so much of a contrast with the structural style of the home as to be distracting. But as the budget would have it, solid cherry beams aren't easy to come by in the desert. So we chose to go with created beams in alder wood, stained to match our existing cherry cabinetry with a smooth more formal finish. Personally, I'm glad for the budgetary hiccup because I love the contrast with the natural stone! To boot, it's easier to add down-lighting to created beams than solid wood ones. (Tip: You will always need more spot lighting than you think you will!)
And, although Stone Creek had a selection of stone to choose from, none was exactly what I was picturing in my mind's eye. But, they were able to work with whatever stone we picked out from any other company. They even picked it up for us. We eventually found exactly the stone I was dreaming of from a local wholesaler, Imperial Wholesale. And, BONUS, they offer a discount coupon when you sign up for their email newsletter!
When we were working with Ariel to design the layout of the media wall, she was able to draw it up in a CAD (computer aided design) type system so we could really get a visual for how it might look. I have to say, on a big project like this, the CAD rendering was a huge help! It allows you to make changes to the design without the impact of changing your mind mid-build. For example, initially I would have balked at the idea of having one of the columns shorter than the other two. But seeing it on the rendering helped me to picture it in my space and to realize that since our entryway was so close to the media wall itself, having the first column a bit shorter gave the illusion of the room growing larger as it went towards the back of the house. To think of it in another way, it didn't make you feel claustrophobic when you entered the house. It also added some visual dimension to the room as well.
To save on the stone costs, Imperial Wholesale was able to special order corners only in the slate we chose. Why is this important you might ask? Well, because when creating a stacked stone column, the corner pieces are actually long enough that the ends cover the flat sides of the column thereby reducing the number of cuts the installer has to make thus reducing your installation costs!
Now, when it comes to natural stone, it can be sealed to make it a bit more impervious to liquids, stains, etc. However, it also changes the natural color of the stone. We chose not to seal the stone on our columns for two reasons: 1) I didn't like the shiny color the stone would have turned when sealed and 2) since it's inside, the chances of it getting wetting or soaking up a lot of water over time to stain or change its color are pretty slim.
In the end, although the media wall has, thus far, been our most expensive project - it is one which we felt added the most "bang for our buck." It's the center of our home and a perfect example of what people can expect when they roam around. It's a bit rustic; a bit refined and (hopefully) warm. Something that as people, I think The Hubs and I are. Or at least we try to be!
But where do you start?
For us, we decided that the perfect place to start was the room that we typically spend the most amount of time in - the living room!
This room would be our one really big splurge. It would be the focal point of our home. And what it needed was a media wall! I'm not talking about just a big television and all the components. I'm talking about a wall that was, in a lot of ways, a work of art.
 |
| The finished media wall as seen from our den, near the entry of the house. Per The Hubs request, it can accommodate up to a 90" television. Just in case we go blind in our old age & need something that large to see our shows on! |
So we reached out to a local company called Stone Creek to discuss what we had in mind. We worked with one of their designers to create the exact vision of what we wanted. In our initial conversations with our designer, Ariel, we told her about how this home was to be our "retirement" home and how we wanted it to be timeless, classic and yet still have a rustic, homey feel to it. We wanted people to feel comfortable when they came in the front door. It had to not only compliment the style of the house and the community we lived in but also be reflective of us and our tastes. We wanted something that would allow for an area to display artwork and pottery as well as allow for the television components to be "hidden" from view. And, as The Hubs insisted, it had to be able to accommodate almost any size television that he wanted to put up there!
 |
| Once the measurements are in, the fabricators at Stone Creak create all the bases for the media wall components before bringing them in & installing them in the designated space. It really takes the whole 'measure twice, cut once' adage to a new level! |
Initially, the dream was rough-hewn, solid cherry beams and stacked slate columns to give our "Santa Barbara Tuscan" style tract home a little more rustic feel without creating so much of a contrast with the structural style of the home as to be distracting. But as the budget would have it, solid cherry beams aren't easy to come by in the desert. So we chose to go with created beams in alder wood, stained to match our existing cherry cabinetry with a smooth more formal finish. Personally, I'm glad for the budgetary hiccup because I love the contrast with the natural stone! To boot, it's easier to add down-lighting to created beams than solid wood ones. (Tip: You will always need more spot lighting than you think you will!)
 |
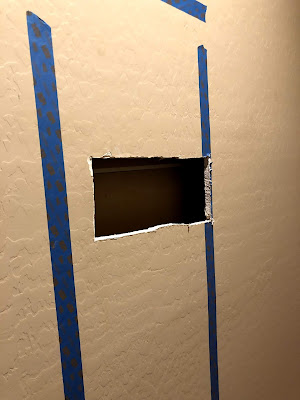
| The alder beams slip over the cleats you see on the wall which are already pre-wired for the lighting. |
And, although Stone Creek had a selection of stone to choose from, none was exactly what I was picturing in my mind's eye. But, they were able to work with whatever stone we picked out from any other company. They even picked it up for us. We eventually found exactly the stone I was dreaming of from a local wholesaler, Imperial Wholesale. And, BONUS, they offer a discount coupon when you sign up for their email newsletter!
 |
| I knew I wanted stacked, natural stone. And, I had always dreamed of slate. I love the variation in the color. But, as you can see, the existing floor tile in our house is a contractor grade neutral & changing out the entire floor isn't in the cards or the budget. So I found myself debating between the slate (right) that I always wanted & quartz (left) which was a little more in keeping with the existing color palette. After a lot of input from family & friends, we decided to go with the slate. |
When we were working with Ariel to design the layout of the media wall, she was able to draw it up in a CAD (computer aided design) type system so we could really get a visual for how it might look. I have to say, on a big project like this, the CAD rendering was a huge help! It allows you to make changes to the design without the impact of changing your mind mid-build. For example, initially I would have balked at the idea of having one of the columns shorter than the other two. But seeing it on the rendering helped me to picture it in my space and to realize that since our entryway was so close to the media wall itself, having the first column a bit shorter gave the illusion of the room growing larger as it went towards the back of the house. To think of it in another way, it didn't make you feel claustrophobic when you entered the house. It also added some visual dimension to the room as well.
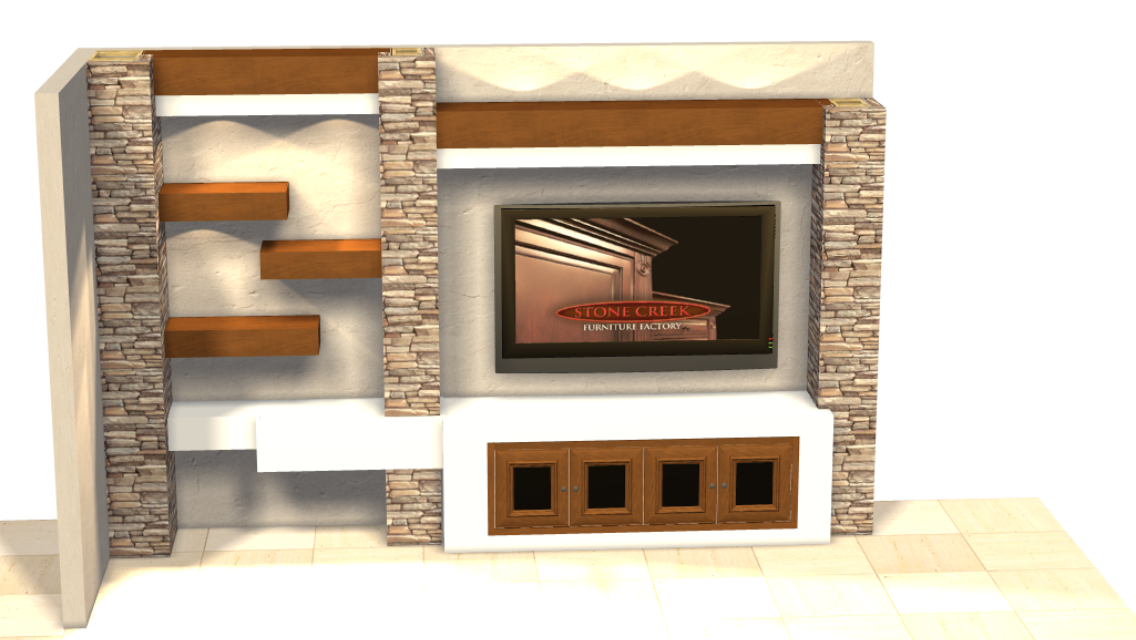 |
| The final CAD rendering from Stone Creek of the media wall with the smooth alder beams. The up lighting on the right hand beam really adds a lot of depth to the room when the lights are turned on in the evening. And, the variation in depths of the stucco portion of the cabinetry don't eat up space in our little floor plan. |
To save on the stone costs, Imperial Wholesale was able to special order corners only in the slate we chose. Why is this important you might ask? Well, because when creating a stacked stone column, the corner pieces are actually long enough that the ends cover the flat sides of the column thereby reducing the number of cuts the installer has to make thus reducing your installation costs!
 |
| We chose a two-toned color scheme to accent the rust-colored oranges in the natural slate stone. And, to make it even more "us," orange happens to be one of my favorite colors! Plus, it just seems to go with the desert landscape - perfect for a southwestern home. |
Now, when it comes to natural stone, it can be sealed to make it a bit more impervious to liquids, stains, etc. However, it also changes the natural color of the stone. We chose not to seal the stone on our columns for two reasons: 1) I didn't like the shiny color the stone would have turned when sealed and 2) since it's inside, the chances of it getting wetting or soaking up a lot of water over time to stain or change its color are pretty slim.
 |
| The finished project before all the furniture was moved in & the pottery was put on the shelves. |
In the end, although the media wall has, thus far, been our most expensive project - it is one which we felt added the most "bang for our buck." It's the center of our home and a perfect example of what people can expect when they roam around. It's a bit rustic; a bit refined and (hopefully) warm. Something that as people, I think The Hubs and I are. Or at least we try to be!
 |
| After a bit more rearranging of the furniture & some more boxes getting unpacked, the media wall now houses a collection of pottery, some vintage books & various other trinkets. |

Comments
Post a Comment